Showing posts with label vanishing point. Show all posts

Thursday, February 11, 2016

Cunningham Park

Just Off the Motorway During the Autumn Season
Canon 60D, EF-S 18-135mm f/3.5-5.6, f/8, 1/60s, 3200ISO, 29mm
New York City has many great parks, and another one close to where I live is Cunningham Park in Queens. You can read about the history of it here: http://www.nycgovparks.org/parks/cunningham-park/history. For the past few summers, my wife, daughter, and I have attended the New York Philharmonic free performances that end with a fireworks show. In the autumn, we enjoy walking down the old roadway of the Long Island Motor Parkway, the first roadway designed for automobile use only, built by William Kissam Vanderbilt II. It was in operation from 1908-1938.

This park has served as the backdrop for a couple of my family portraits and Halloween portraits. If one finds themselves in Eastern Queens, I recommend a visit to this park.

Wednesday, January 27, 2016

Wide Angle Wednesday HDR

CityScape Vanishingpoint
Canon 60D, Tokina Pro DX-II 11-16mm f/2.8, f/8, 1/250sec, 200ISO, 11mm

This photo was taken from a pedestrian overpass over Central Avenue in Downtown Phoenix. Central Avenue had been blocked off for City Skate, a small ice skating rink (the skate rental tent is visible in the lower third of this photo).  

When I loaded my photos on my computer, this shot was giving me a hard time, as the shadows were still too dark or the highlights were too bright. So I decided to make an HDR photo from this single shot, creating two additional copies of the file in Lightroom, with the same settings except for overall exposure of either + or - 1.5EV from the original. I used the Photomatrix plugin with Lightroom, and this final image was created. 

Here's a shot of the rink, just cause.

CitySkate
Canon 60D, Tokina Pro DX-II 11-16mm f/2.8, f/8, 1/500sec, 200ISO, 11mm
 

Wednesday, October 22, 2014

Wide Angle Wednesday

Grace
Canon 60D, Tokina Pro DX-II 11-16mm f/2.8, f/8, 1/200sec, 640ISO, 11mm

A wide angle lens really helps me capture the soaring nature of the buidlings of Manhattan. These photographs were all taken not too far from the base of each of these buildings. The Grace Building looks even more massive when you compare the tiny people to the towering structure it appears to be in the above photograph.

Between A Rock and a Rink
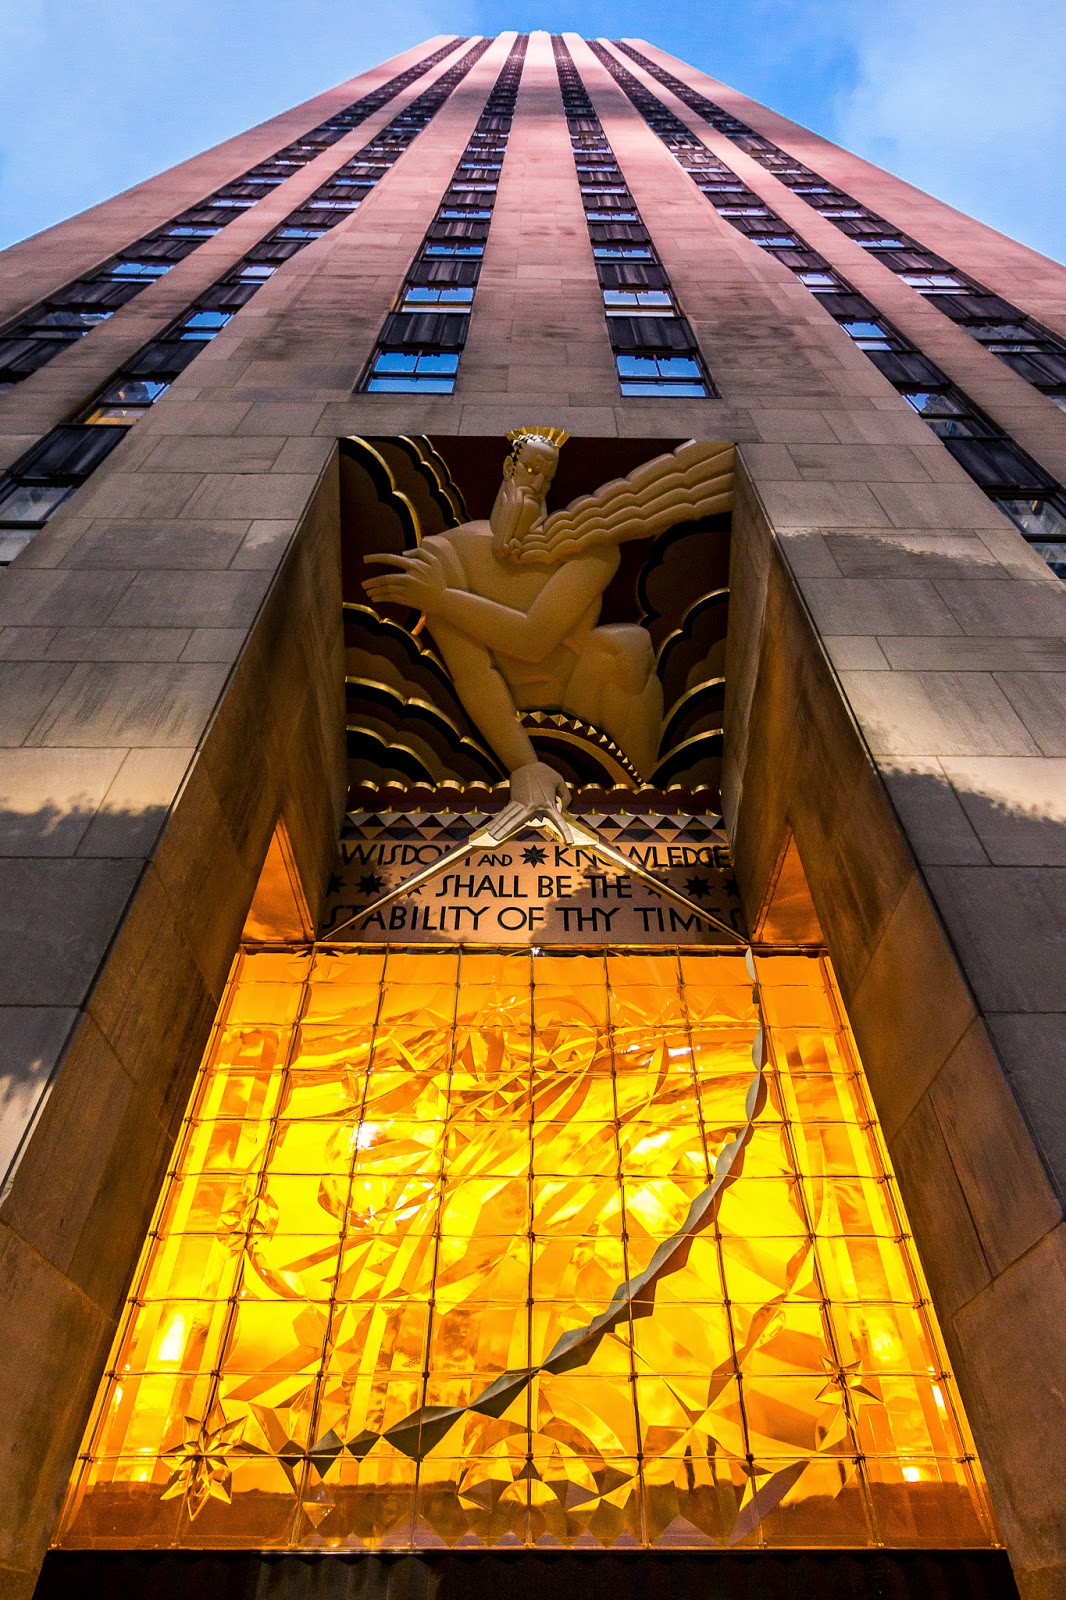
Canon 60D, Tokina Pro DX-II 11-16mm f/2.8, f/4, 1/30sec, 1600ISO, 11mm
30 Rockefeller Center, above, is one of the sites in New York City that attracts visitors. The above photograph was captured one Saturday night in the beginning of August, right after the sunset and the sky was beginning to turn dark blue. The shadow of SplitRocker is visible as it was on display at the time.

Empire Views
Canon 60D, Tokina Pro DX-II 11-16mm f/2.8, f/2.8, 1/30sec, 6400ISO, 11mm
Empire State Building as captured across 34th Street. I had to set my ISO to almost the highest setting, so noise is very present in this image. Aperture was left wide open and I set it on the lowest shutter speed I could hand hold and get a crisp shot. If I had a tripod, I could have captured a lower noise image, but having a noisy image is better than none at all.


Wednesday, October 8, 2014

Wide Angle Wednesday

The perks of my job is that I get to see different vantage points of the city. This past weekend I found myself in the old New York Times Building. Times Square is much more tolerable when you are 15 stories up (though technically 14, they skipped the 13th floor).

Old New York Times
Canon 60D, Tokina Pro DX-II 11-16mm f/2.8, f/8, 30sec, 100ISO, 11mm

Monday, July 28, 2014

Shorty Forty

One of the things that every photographer suffers from at some point is gear lust. You want to buy every piece of gear available, more lenses, perhaps a better body, lots of accessories. I am no different. 
 
Underground
Canon EOS Rebel T3i, EF50mm f/1.8, f/1.8, 1/60s, 400ISO, 50mm

My first photography purchase was actually the Nifty Fifty, the Canon EF 50mm f/1.8 lens. I used this lens with the company's Canon Rebel T2i, before I had purchased my first body, the Rebel T3i. It was great, I could shoot wide open (aperture at f/1.8) to get that oh so desirable bokeh. It is a cheap lens, I picked it for $109 before tax.
 
Fallen Wood
Canon EOS Rebel T3i, EF50mm f/1.8, f/2.8, 1/250s, 100ISO, 50mm

The Nifty Fifty, and the Shorty Forty, are both prime lenses, meaning that they have a fixed focal length. Prime lenses are great photographers of all skill levels. They usually have faster apertures than a zoom lens, lighter, and cheaper as well. One of the things that a fixed focal length also forces a new photographer to do is think about composition. Zoom lenses allow you to be lazy, all you have to do is zoom in or out from your same vantage point. A prime lens forces you to zoom with your feet. If you want to get more of the scene in the frame, you have to physically walk back, if you want to fill the frame with your subject, you have to get closer. Sometimes, you are not able to physically get closer or further, so you will have to change your framing to compensate, look at the scene in a new way. 
 
From the Hip
Canon EOS Rebel T3i, EF50mm f/1.8, f/1.8, 1/60s, 100ISO, 50mm

I believe on of my best investements was a prime lens. Of course, when I first obtained my Nifty Fifty, I was shooting everything wide open, which at f/1.8, allows more light in, allowing for faster shutter speeds, but will create a shallow depth of field, so the part of the image in focus was minimal. When you move from a kit lens that only opens to f/3.5, you can't help yourself.

When my Rebel T3i was stolen, I had the Nifty Fifty mounted. I was glad that it was the cheap lens, though I was still bummed about the whole camera gear being stolen, I tried to look at the bright side of things and realize it could have been worse. The Rebel was replaced by a Canon 60D, so my primary lens was the Canon EF-S 18-135mm f/3.5-5.6 kit lens that was purchased with the now stolen Rebel. After Christmas about 8 months later, I had some gift cards, and decided I wanted a prime lens again.

Having owned the Nifty Fifty, I knew it was cheap, but there were somethings about it I didn't like. It felt cheap, the AF motor was noisy. My budget was low, as I only had a couple gift cards, so the EF 50mm f/1.4 was too expensive as were a few other primes.

Canon had released a pancake lens, called that because of how flat it was, and my interest was piqued.The pancake lens, the Shorty Forty, or EF 40mm f/2.8, was a little wider than the 50mm, but since I shoot on a crop body, I thought that would be fine. Many sites have said that 50mm on a full frame camera is about the equivalent of what your eye sees. On a Canon crop body, the 50mm is about 80mm, while the 40mm is about 64mm.

I ended up purchasing the Shorty Forty. Though the max aperture is f/2.8 as opposed to f/1.8, you end up stopping down the aperture anyways, so that wasn't too big of and issue. Reading reviews, time and time again they discussed how sharp it was for the price, even wide open. I decided to purchase it and am very happy I did.
 
Sunset over Manhattan from Queens
Canon 60D, EF40mm f/2.8, f/8, 1/1000s, 100ISO, 40mm

One of the things I like most about the Shorty Forty is how small it is. I can leave it mounted to my 60D, and the camera isn't large or cumbersome to carry around when I go out with my family, or even if I just throw it in my bag on the way to work. I found myself wanting to take my camera more places. When shooting for work, I sometimes would just throw the Shorty Forty in my pocket while the camera body will have the wide angle attached, and it allows me to capture some details shots, as the minimum focusing distance is pretty close for a non-macro lens. 
Signs of Spring
Canon 60D, EF40mm f/2.8, f/8, 1/125s, 160ISO, 40mm

There is one thing that I don't like about the lens. The lens focusing mechanics only work when the camera is on. This means that if you leave the lens protruding, though it doesn't that much, you can't manual focus it back when the camera is off. This also means that the lens can't focus when used with cheap macro extension tubes since those tubes don't have electrical contacts. Other than that though, this lens shines! 
Auburndale Snow
Canon 60D, EF40mm f/2.8, f/8, 1/50s, 640ISO, 40mm

I highly recommend this to anyone looking for their first foray outside of the kit lens their camera came with when purchased. It probably is attached to my camera more than any other lens at this point.

Wednesday, July 23, 2014

Wide Angle Wednesday

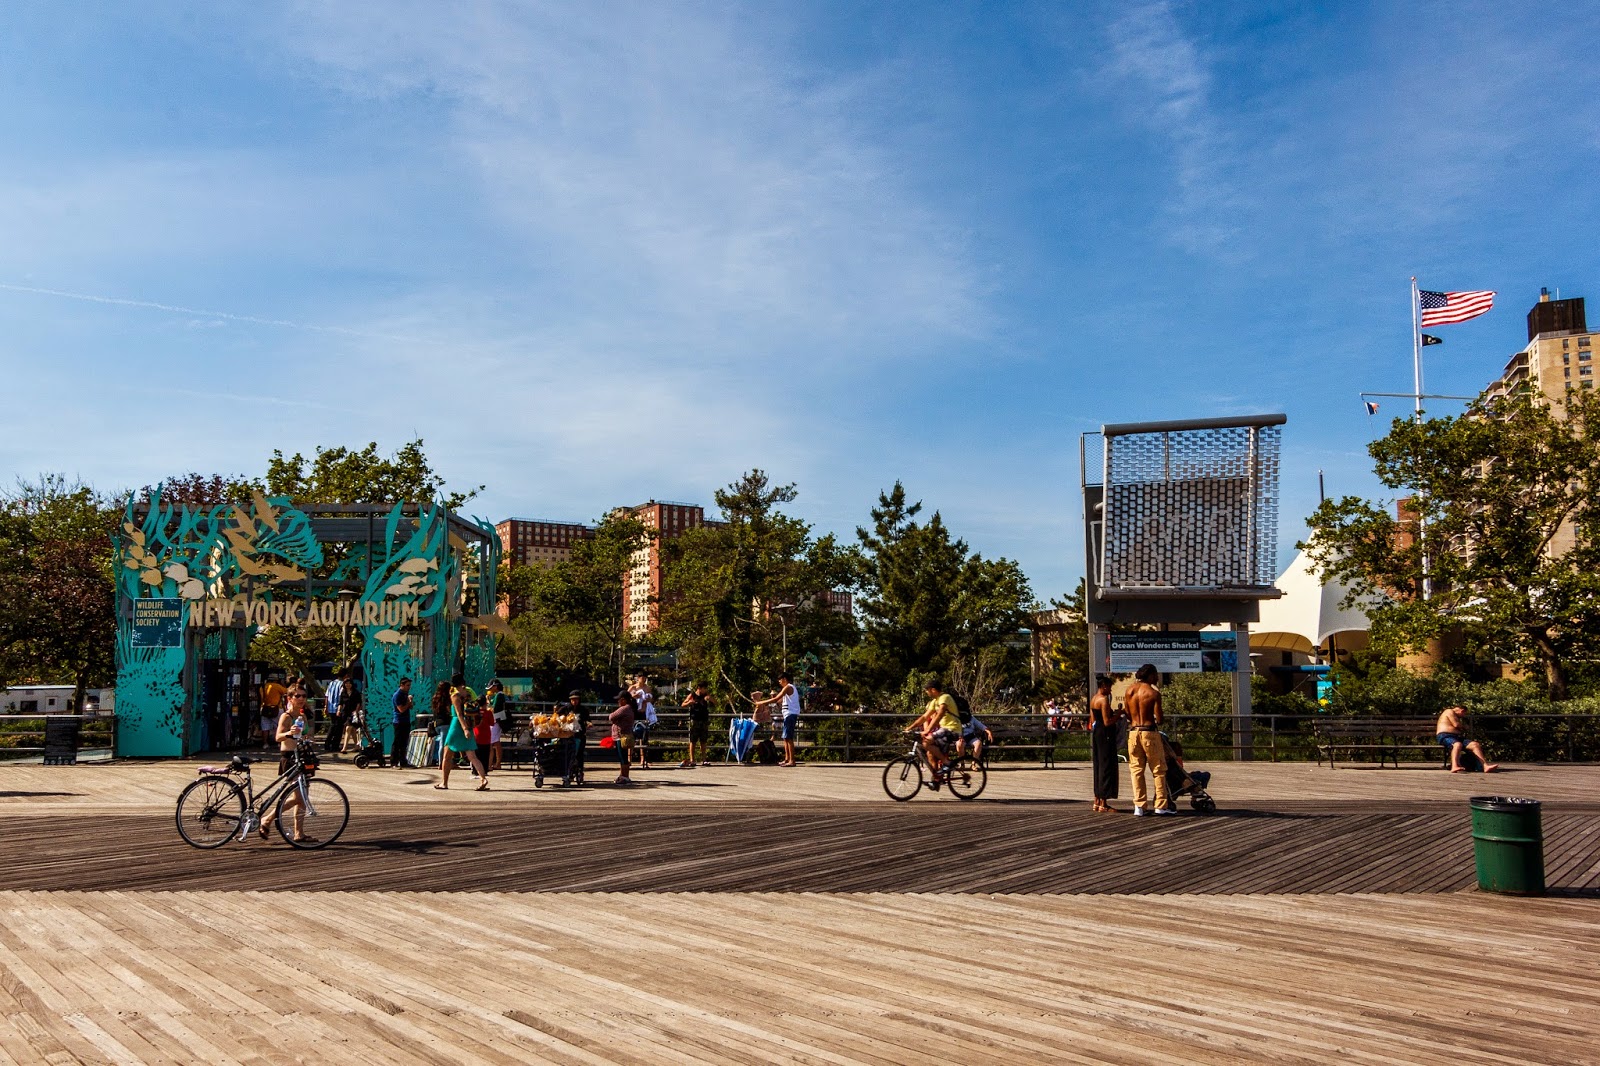
Summertime has always meant visiting Coney Island ever since I moved to New York City. This year has been no exception. But this last trip, decided to take the wide angle lens with me.

New York Aquarium Boardwalk Entrance
Canon 60D, Tokina Pro DX-II 11-16mm f/2.8, f/16, 1/125s, 100ISO, 14mm


Unfortunately, the New York Aquarium was hit hard by super storm Sandy in the fall of 2012. They are still rebuilding, so it is a very quick trip, but still worth the admission as we are members!

Shore thing
Canon 60D, Tokina Pro DX-II 11-16mm f/2.8, f/16, 1/160s, 100ISO, 13mm
These restrooms popped up after Sandy as well.

A trip to Coney Island deserves a stroll down the boardwalk. Usually a trip to Nathan's as well, but at least some sort of unhealthy food option. My sister, one summer when she visited, ordered a corn on the cob from Nathan's Famous, and was disappointed. I had to point out that they are famous for their hot dogs, not their corn!


Boardwalking
Canon 60D, Tokina Pro DX-II 11-16mm f/2.8, f/16, 1/320s, 100ISO, 13mm

We used to frequent the Freak Show there, but haven't in a couple years, perhaps next year. I'm sure our daughter will enjoy it when she is 3 going on 4.

Boardwalk Vanishing Point
Canon 60D, Tokina Pro DX-II 11-16mm f/2.8, f/16, 1/100s, 100ISO, 11mm

Saturday, July 12, 2014

Post Processing a Single RAW

34 Street Vanishing Point
Canon 60D, Tokina Pro DX-II 11-16mm f/2.8, f/4, 1/50s, 100ISO, 11mm
High Dynamic Range, or HDR Photography is a style that polarizes the photography community. There are plenty of resources out there that will explain what HDR is, and how to accomplish it, but I will attempt to give a summary. 

Your camera has a dynamic range, in simple terms, it is how much data it can collect from blacks to whites. Some cameras have better dynamic range than others, but as of now, no camera is going to have the same dynamic range as your eyes perceive. If you take a picture of a high contrast scene, the camera will not be able to gather all the details in the dark areas and the bright areas, even though you are able to see the shadows and the lighter areas fine. One way that some photographers combat this problem is to utilize HDR. One method of HDR photography is to bracket your shots, that is to take one shot for "proper" exposure, then another shot a stop or more underexposed, and another shot overexposured. Using software, such as Adobe Photoshop, or what I use, Photomatrix, you will then combine these images into one image to give you a final HDR image.

The problem with some HDR photography, much like any post processing techniques, is that the result can look "overbaked". I suffered from this when I first started. You push the sliders too much, and you are left with an image that looks completely unnatural. I try to keep my processing towards the natural side these days and aiming to tweak to compensate for my cameras short comings. I want to convey what my eye saw when I captured an image. Not to say I don't take a little artistic license with some landscape shots, but I also am not trying to create a gaudy over saturated image either.

I'm going to share how I created the above image from a single RAW.

I started with capturing an image, trying to nail the exposure in camera to limit post processing needed. Unfortunately, the dynamic range of the scene was too broad, with the dark shadows and bright sunlight. I had taken the image handheld, and hadn't thought to bracket the shot. So I had one RAW image to work with, which should allow me with enough leeway to go about 3 stops over or under exposure in post.

After importing my image into Adobe Lightroom, I tried to see if I could edit it to a version I was happy with, but was still a little too blown out, or too dark. So I decided to make a two virtual copies in Lightroom.

Original Image with Lightroom Edits
The original base image was reduced by half a stop in exposure, tweaked the highlights, shadows, blacks and white, with clarity bumped up as well. Lens correction, which applies distortion correction and remove color fringing, was applied, as well as some sharpening. As you can see, the sky is a little too bright, and we are loosing some of the details in the shadows.

The "first" virtual copy received the same edit since it was a copy of the original image. Then the exposure was increased to 1.5 stops (2 stops over the above image). The darker areas of the image are now more visible. That gave me this result:

Overexposed Virtual Copy #1
The "second" copy had the same edits, but then exposure was decreased to -2.5 (2 stops less than the original edit). The sky has turned from white to the blue that I saw when taking the image. The result gave me this:

Underexposed Virtual Copy #2
 At this point, I now had three images. I then used the Photomatrix plugin for Lightroom to merge the three images to a 32bit HDR file. The file created was a TIFF. The new file received a little more editing in Lightroom, and the result was the image in the beginning of the post. 

I hope you enjoyed a peak at my workflow!

Friday, July 11, 2014

Another Vanishing Point

Recently received some feedback from a couple of friends that said they loved the vanishing point post. So this post is for you!

Sunrise in Queens
Canon 60D, Tokina Pro DX-II 11-16mm f/2.8, f/4, 1/320s, 640ISO, 16mm
Living in New York City, I am constantly seeing vanishing points. The straight railroad tracks of the commuter railroads and subways, the grid pattern of streets in Manhattan, the rising modern skyscrappers, I can't escape them!

34th Street Vanishing Point
Canon 60D, Tokina Pro DX-II 11-16mm f/2.8, f/4, 1/50s, 100ISO, 11mm
This shot of 34th Street was taken from a rooftop, about 9 stories high. This was a single image, but due to the lighting conditions, I ended up creating an HDR image out of the single RAW file. I will share this processes in a future post.

Wild Asia Monorail Wait
Canon 60D, EF 75-300mm f/4-5.6, f/8, 1/400s, 800ISO, 75mm
This shot from the Bronx Zoo is from a telephoto lens I inherited from my uncle. My family and I are members of the Wildlife Conservation Society, which grants us admission to four zoos and an aquarium. Needless to say, we take full advantage of our membership and are at a zoo a lot. 

Highline Park
Canon 60D, EF-S 18-135mm f/3.5-5.6, f/8, 1/125s, 400ISO, 18mm
 Highline Park is a park that was built on the remnants of a former elevated freight train line on the West Side of Manhattan in the Chelsea neighborhood. It is a recent addition to the city, the park that is, the elevated structure was completed in 1934. Interstate trucking reduced the need for the elevated line, leading to destruction of the southern section in the 60s, and the last freight train was in 1980.

Friday, June 13, 2014

Vanishing Points

Canon 60D, EF 40mm f/2.8 STM, f/4, 1/100s, 3200ISO, 40mm


I love a good vanishing point. Forced Perspective and all that jazz. Living in NYC, I am constantly seeing them, from the two tracks leading into and out of my railroad station, to the grid in Manhattan. Part of my brain loves the symmetry of a vanishing point photograph. 

Looking Up for Grace
Canon 60D, EF-S 18-135mm f/3.5-5.6, f/16, 1/6400s, 160ISO, 18mm
Canon 60D, EF-S 18-135mm f/3.5-5.6, f/13, 1/40s, 160ISO, 36mm
Into the Mouth of Madness
Canon 60D, EF 40mm f/2.8 STM, f/8, 1/125s, 640ISO, 40mm